SimpleBoxes.e

Move to Zürich

I have moved to Zürich on July from Auckland where I've been in about 10 years.

[Photo] Panorama view on Lindenhof hill

I am working as a software engineer here in Zürich for IT company which is based on California and runs a sort of cloud services.

It took about 3 months to get working permit in Switzerland after getting an offer. It was a bit tough time for us because we had no idea when it would be completed.

Once my family and I have got the permit, we were so busy to handle everything, ... arrange for moving; telling to friends, relatives, and coworkers; arrange process for our house; etc etc ...

Due to hard effort of my daughter and wife, we can finally arrive at Zürich.

Brief summary until getting into Switzerland:

Sep 2012
Applied the position. Sent my CV to the company.
Oct 2012
Rejected the application due to the extensive visa application process.
Dec 2012
Contacted from the company.
Jan 2013
Technical interview via Skype (1st).
Jan 2013
Technical interview via Skype (2nd).
Jan 2013
Technical interview via Skype (3rd).
Jan 2013
Interview with HR via phone.
Feb 2013
Interview. Got the offer.
Feb 2013
Signed the offer.
Mar 2013
Started visa application process.
Mar 2013
Submitted required documents.
Apr 2013
Got visa approval from Switzerland Federal Authority.
Apr 2013
Got final approval for myself.
May 2013
Got final approval for family.
Jul 2013
Arrived at Zürich.
Aug 2013
Family & cats arrived.

I would like to really thank our friends and coworkers. New Zealand is great country to live, I'm certainly missing all friends and life in New Zealand. Please keep in touch.

Home screen on my iPhone (iOS6)

It's inspired from Today's home screen on my iPhone (in Japanese) ("今日のiPhoneホーム画面" is original title in Japanese)

Home screen on iOS6

It's likely the last home screen in iOS6. I'm sorry it's a bit hard to see because I've put all 5 screens together.

1st screen
Only Apple's standard apps, except "Podcasts". However Podcasts app seems semi-standard app.
2nd screen
Social apps & daily use. I've tried put blue-ish icons on left, red-ish icons on right.
3rd screen
Apple, Google, Evernote then my apps.
4th screen
Dictionaries, books.
5th screen
banks, trains, and some others ...

I tend to ...

  • avoid using Folder if possible.
  • put similar coloured icons together.
  • put more likely used app at bottom.

A table of iOS devices

I've created a table to list iOS devices for my development purpose (2014 Nov):

DevicesReleaseCPUScreeniOS
Version2345678
iPhone2007armv6320 x 4801.0 - 3.1.3 OKOKNGNGNGNGNG
iPhone 3G2008armv6320 x 4802.0 - 4.2.1 OKOKOKNGNGNGNG
iPhone 3GS2009armv7320 x 4803.0 - 6.1.4 NGOKOKOKOKNGNG
iPhone 4 (GSM)2010armv7640 x 960 *4.0 - 7.1.2 NGNGOKOKOKOKNG
iPhone 4 (CDMA)2011armv7640 x 960 *4.2.5 - 7.1.2 NGNGOKOKOKOKNG
iPhone 4S2011armv7640 x 960 *5.0 - NGNGNGOKOKOKOK
iPhone 52012armv7s640 x 1136 *6.0 - NGNGNGNGOKOKOK
iPhone 5c2013armv7s640 x 1136 *7.0 - NGNGNGNGNGOKOK
iPhone 5s2013arm64640 x 1136 *7.0 - NGNGNGNGNGOKOK
iPhone 62014arm64750 x 1334 *8.0 - NGNGNGNGNGNGOK
iPhone 6 plus2014arm641242 x 2208 **8.0 - NGNGNGNGNGNGOK
  
iPod touch2007armv6320 x 4801.1 - 3.1.3 OKOKNGNGNGNGNG
iPod touch (2nd)2008armv6320 x 4802.1.1 - 4.2.1 NGOKOKNGNGNGNG
iPod touch (3rd)2009armv7320 x 4803.1 - 5.1.1 NGOKOKOKNGNGNG
iPod touch (4th)2010armv7640 x 960 *4.1 - 6.1.4 NGNGOKOKOKNGNG
iPod touch (5th)2012armv7640 x 1136 *6.0 - NGNGNGNGOKOKOK
  
iPad2010armv7768 x 10243.2 - 5.1.1 NGOKOKOKNGNGNG
iPad 22011armv7768 x 10244.3 - NGNGOKOKOKOKOK
iPad (3rd)2012armv71536 x 2048 * 5.1 -NGNGNGOKOKOKOK
iPad (4th)2012armv7s1536 x 2048 * 6.0 -NGNGNGNGOKOKOK
iPad Air2013arm641536 x 2048 *7.0 - NGNGNGNGNGOKOK
iPad Air 22014arm641536 x 2048 *8.1 - NGNGNGNGNGNGOK
  
iPad mini2012armv7768 x 10246.0 - NGNGNGNGOKOKOK
iPad mini Retina2013arm641536 x 2048 *7.0 - NGNGNGNGNGOKOK
iPad mini 32014arm641536 x 2048 *8.1 - NGNGNGNGNGNGOK

"CPU" actually means "CPU architecture". Emphasized text in Screen indicates "Retina display".** represents 3x resolution.

The following versions of iOS work for specific devices:

3.2.*Only for 1st generation iPad
4.0 - 4.1Not working for iPad
4.2.5 - 4.2.10Only for iPhone 4 (CDMA).
References:

Reeder on Safari

[Screen Shot] Reeder on Safri

Reeder is a great stand-alone application to browse Google Reader.

Reeder for Chrome (Unofficial) is a Chrome extension and it's inspired from Reeder to browse Google Reader on Chrome with similar look & feel to Reeder.

Unfortunately development of RFC has been suspended. However its code has been opened on GitHub.

Main funtionality of RFC, i.e. its look & feel, is implemented in CSS, so it can be applied into other browsers via Stylish (or equivalent functionality, like user style sheet).

  1. Download Stylish from Stylish for Safari.
  2. Open Stylish management page from Stylish button on toolbar.
  3. Select "Edit" to open edit screen:
    Title
    RFC
    CSS
    Copy CSS from GitHub.
    Applies to
    Select "Regexp" then, input https?://www.google.*/reader/.*

Now you can see Google Reader with Reeder-ish style. I recommend using "3 coulmns style".

It can be applied into Firefox via Stylish, you however need to modify CSS a bit because original CSS is using Webkit specific CSS properties.

Auckland Marathon 2011 (half marathon)

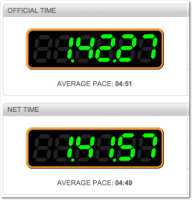
I've finished Half Marathon at adidas Auckland Marathon 2011 → My time is around 1 hour and 42 mins.

It's my first half marathon. I'm glad at my time which is faster than my target time (1 hour and 45 mins).

I've been jogging about 3 km after work for 2 years to be fit myself. At the begging of this year, I decided to try longer distance.

Although I've considered full marathon (42.195 km); it's too long as the first try, so I decided to enter half marathon.

Auckland Marathon starts very early in the morning; before sunrise.

[Picture] At Devonport

Too early for normal public transport, but there are special ferries and special buses for the Marathon.

There are about 4 km to the closest bus stop of the special buses; so I have to walk (and jog a bit) there, it was good warm-up for me as a result.

[Picture] Sunrise from the start point

The start point is the same for full marathon and half marathon. Full marathon started first then half marathon started. I could see sunrize during waiting a start.

[Picture] Start gate

Here was the start gate. You can see "Elite" sign, can't you? Faster runners lined at the start gate then slower runners started at posterior.

[Picture] At Northcote

About 10 km from the start, my wife and daughter cheered me. My daughter has created a big banner for me.

[Picture] Climbing Harbor Bridge

About 15 km from the start, finally I've started climbing Harbor Bridge.

It's just started, I had to climb about 1 km long steep hill...

[Picture] The flags on the bridge

There are New Zealand national flags on the top of the bridge.

[Picture] City from the bridge

Only cars can go through Harbor Bridge usually. So I would like to take pictures when I ran on the bridge.

I've brought my mobile phone to take pictures. Fortunately it's sunny day and bright enough to take pictures without stop.

[Picture] At the goal

At the goal. The runner with yellow balloons was "Pace Maker".

[Picture] Last spurt

Finally I could reach the goal. There are a lot of up-down in the course; it was tough. I'm not sure I can run full marathon next time.

Pudding

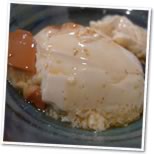
In this about a half year, I am making a pudding every week. It seems to score high points with not only my family but also my friends.

The original recipes come from "Cookpad" which is the most famous sharing recipe website in Japan.

Caramel sauce

[→Original recipe (in Japanese)]

The following ingredients for about three puddings.

  • Water : 100 ml
  • Caster suger : 200 g
  • Boiled water : 100 ml
  1. Putting sugar into the water then heating it over moderate heat.
  2. It will become brown after boiling.
  3. Stopping heating when it became dark brown.
  4. Putting boiled water into it. [Caution] Please be careful not to burn.

Pudding (steamed)

[→Original recipe (in Japanese)]

I'm using a pressure cooker (Fissler in Japanese) for this.

  • Milk : 500 〜 550 ml
  • Brown sugar : 40 g
  • Egg : 3
  • Vanilla extract : a few drops

[Picture]Pudding ingredients

I'm using a glass bowl although using 4 small glasses in the original recipe.

[Picture]Making pudding STEP 1 Pouring caramel source into the bowl. Putting about 200 cc water into the pressure cooker then putting the bown on steamer bascket.
[Picture]Making pudding STEP 2 Heating and stirring milk with sugar over gentle heat.
[Picture]Making pudding STEP 3 Whisking eggs then pouring the milk into it. Stirring it well.
[Picture]Making pudding STEP 4 Adding vanilla extract then pouring fluid pudding onto caramel source (using a sieve basket to strain).
[Picture]Making pudding STEP 5 Steaming it with the pressure cooker (using lower pressure level). Taking 2 minutes after a pressure ring up.
[Picture]Making pudding STEP 6 Then stopping heating. Leaving it about 1 hour without heating. Putting it into fridge, it will be ready to eat next day.

He was so tired ...

Two kittens joined my family.

[Photo] Kittens who joined our family.

I took over two kittens from my coworker.

They were gradually getting used to our house, although they were a bit nervous when they came. Now they are often playing together freely.

My birthday present is ...

I was getting one year older this week.

Usually we go out to eat on the family member's birthday.

I thought that I'd like to eat "Italian" this year, so we've been to PORTOFINO in Takapuna.

[Photo] Spaghetti Alla Bolognese

[Photo] Chiken Fettechine

[Photo] Pizza Prosciutto

It was quite good. We really enjoyed the dinner.

Good meal and my family make me so happy, and there was futher surprise on that day......

......

............

..................

........................

[写真]2009 年の誕生日プレゼント

Wow! That's a recliner!

It has footrest, too. I've never known we call it "ottoman" so far.

I wonder where my wife hide it in our house. She said "You may notice it..." ... No, I have never noticed.

Thank you very much. I am a really lucky man.

Updating my Lightbox script (ver 20090729)

I haven't implemented new feature in Lightbox script in ages, but I've mucked around with my Lightbox script aka "Lightbox plus" in this month. You can see the details and samples in Lightbox plus page

Lightbox is very cool and useful script to display an image on the page. Lightbox is quite attractive, so nowadays we have a lot of alternatives (see examples). Lightbox plus is one of alternatives as well.

The original "Lightbox" has been updated as Lightbox JS v2 which supports several new feature such as image set and cool animation transition. I've already implemented image set feature in lightbox plus, however I haven't touch any animation transition so far. Recently one of my script users requested animation transition into my script, so I tried to implement this feature.

Fortunately my script has already been using a timer (setInterval) to keep the proper position and size for a image against the browser window.

Once the corresponding anchor is clicked, _show method will be called. The lightbox will start a timer in _show as follows:

self._timer = window.setInterval( function() { self._run() }, 20);

_run method is a callback of the timer, so it will be called priodically. Animation transition is not main functionality for my lightbox, so I've made do with simple implementation.

I've added new member variable _anim.step to check the current state regrding animation.

  • 0 : initial resizing (opening lightbox)
  • 1 : fading in (opening lightbox)
  • 2 : done animation (lightbox is opened)
  • 3 : fading out (closing lightbox)

So it's quite obvious what the script is doing in _run.

_run : function()
{
  var self = this;
  self._set_size(true);
  if ( self._anim.step == 0 || self._anim.w != self._img.width || self._anim.h != self._img.height )
  {
    self._doResizing();
  }
  else if ( self._anim.step == 1 )
  {
    self._doFadeIn();
  }
  else if ( self._anim.step == 3 )
  {
    self._doFadeOut();
  }
  else
  { // normal state
    self._img.width = self._anim.w;
    self._img.height = self._anim.h;
    self._show_caption(true);
  }
}

Resizing image will occur when a user enlarges the image, resizes the window, or changes the zoom level of the image. So the lightbox will do resizeing in those cases as well.

The latest lightbox script (ver 20090729) also supports the delayed initialization.

Normally the lightbox will check through all anchors (links) in the page when the page is loaded. There is the following code at the end of script:

Spica.Event.run(function() { 
  var lightbox = new Lightbox({
    loadingimg:'resource/loading.gif',
    expandimg:'resource/expand.gif',
    shrinkimg:'resource/shrink.gif',
    blankimg:'resource/blank.gif',
    previmg:'resource/prev.gif',
    nextimg:'resource/next.gif',
    closeimg:'resource/close.gif',
    effectimg:'resource/zzoop.gif',
    effectpos:{x:-40,y:-20},
    effectclass:'effectable',
    resizable:true,
    animation:true
  });
});

The code Spica.Event.run means running at onLoad.

You can modify this code if you want to update or initialize the lightbox at your own timing as follows:

var lightbox = new Lightbox({
  loadingimg:'resource/loading.gif',
  expandimg:'resource/expand.gif',
  shrinkimg:'resource/shrink.gif',
  blankimg:'resource/blank.gif',
  previmg:'resource/prev.gif',
  nextimg:'resource/next.gif',
  closeimg:'resource/close.gif',
  effectimg:'resource/zzoop.gif',
  effectpos:{x:-40,y:-20},
  effectclass:'effectable',
  resizable:true,
  animation:true,
  skipInit:true
});

Then later you can call refresh method at the time when the page is ready.

lightbox.refresh(window.document);

window.document could be any DOM element here.

1/2