SimpleBoxes.e | dev

A table of iOS devices

I've created a table to list iOS devices for my development purpose (2014 Nov):

DevicesReleaseCPUScreeniOS
Version2345678
iPhone2007armv6320 x 4801.0 - 3.1.3 OKOKNGNGNGNGNG
iPhone 3G2008armv6320 x 4802.0 - 4.2.1 OKOKOKNGNGNGNG
iPhone 3GS2009armv7320 x 4803.0 - 6.1.4 NGOKOKOKOKNGNG
iPhone 4 (GSM)2010armv7640 x 960 *4.0 - 7.1.2 NGNGOKOKOKOKNG
iPhone 4 (CDMA)2011armv7640 x 960 *4.2.5 - 7.1.2 NGNGOKOKOKOKNG
iPhone 4S2011armv7640 x 960 *5.0 - NGNGNGOKOKOKOK
iPhone 52012armv7s640 x 1136 *6.0 - NGNGNGNGOKOKOK
iPhone 5c2013armv7s640 x 1136 *7.0 - NGNGNGNGNGOKOK
iPhone 5s2013arm64640 x 1136 *7.0 - NGNGNGNGNGOKOK
iPhone 62014arm64750 x 1334 *8.0 - NGNGNGNGNGNGOK
iPhone 6 plus2014arm641242 x 2208 **8.0 - NGNGNGNGNGNGOK
  
iPod touch2007armv6320 x 4801.1 - 3.1.3 OKOKNGNGNGNGNG
iPod touch (2nd)2008armv6320 x 4802.1.1 - 4.2.1 NGOKOKNGNGNGNG
iPod touch (3rd)2009armv7320 x 4803.1 - 5.1.1 NGOKOKOKNGNGNG
iPod touch (4th)2010armv7640 x 960 *4.1 - 6.1.4 NGNGOKOKOKNGNG
iPod touch (5th)2012armv7640 x 1136 *6.0 - NGNGNGNGOKOKOK
  
iPad2010armv7768 x 10243.2 - 5.1.1 NGOKOKOKNGNGNG
iPad 22011armv7768 x 10244.3 - NGNGOKOKOKOKOK
iPad (3rd)2012armv71536 x 2048 * 5.1 -NGNGNGOKOKOKOK
iPad (4th)2012armv7s1536 x 2048 * 6.0 -NGNGNGNGOKOKOK
iPad Air2013arm641536 x 2048 *7.0 - NGNGNGNGNGOKOK
iPad Air 22014arm641536 x 2048 *8.1 - NGNGNGNGNGNGOK
  
iPad mini2012armv7768 x 10246.0 - NGNGNGNGOKOKOK
iPad mini Retina2013arm641536 x 2048 *7.0 - NGNGNGNGNGOKOK
iPad mini 32014arm641536 x 2048 *8.1 - NGNGNGNGNGNGOK

"CPU" actually means "CPU architecture". Emphasized text in Screen indicates "Retina display".** represents 3x resolution.

The following versions of iOS work for specific devices:

3.2.*Only for 1st generation iPad
4.0 - 4.1Not working for iPad
4.2.5 - 4.2.10Only for iPhone 4 (CDMA).
References:

Reeder on Safari

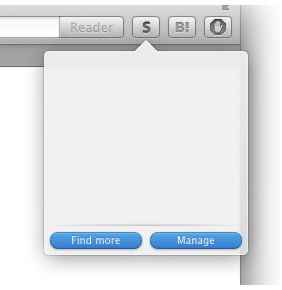
[Screen Shot] Reeder on Safri

Reeder is a great stand-alone application to browse Google Reader.

Reeder for Chrome (Unofficial) is a Chrome extension and it's inspired from Reeder to browse Google Reader on Chrome with similar look & feel to Reeder.

Unfortunately development of RFC has been suspended. However its code has been opened on GitHub.

Main funtionality of RFC, i.e. its look & feel, is implemented in CSS, so it can be applied into other browsers via Stylish (or equivalent functionality, like user style sheet).

  1. Download Stylish from Stylish for Safari.
  2. Open Stylish management page from Stylish button on toolbar.
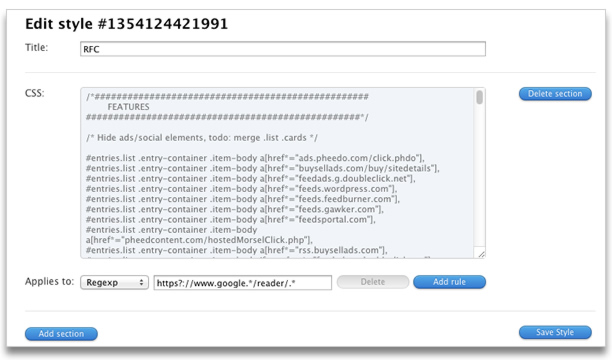
  3. Select "Edit" to open edit screen:
    Title
    RFC
    CSS
    Copy CSS from GitHub.
    Applies to
    Select "Regexp" then, input https?://www.google.*/reader/.*

Now you can see Google Reader with Reeder-ish style. I recommend using "3 coulmns style".

It can be applied into Firefox via Stylish, you however need to modify CSS a bit because original CSS is using Webkit specific CSS properties.

Updating my Lightbox script (ver 20090729)

I haven't implemented new feature in Lightbox script in ages, but I've mucked around with my Lightbox script aka "Lightbox plus" in this month. You can see the details and samples in Lightbox plus page

Lightbox is very cool and useful script to display an image on the page. Lightbox is quite attractive, so nowadays we have a lot of alternatives (see examples). Lightbox plus is one of alternatives as well.

The original "Lightbox" has been updated as Lightbox JS v2 which supports several new feature such as image set and cool animation transition. I've already implemented image set feature in lightbox plus, however I haven't touch any animation transition so far. Recently one of my script users requested animation transition into my script, so I tried to implement this feature.

Fortunately my script has already been using a timer (setInterval) to keep the proper position and size for a image against the browser window.

Once the corresponding anchor is clicked, _show method will be called. The lightbox will start a timer in _show as follows:

self._timer = window.setInterval( function() { self._run() }, 20);

_run method is a callback of the timer, so it will be called priodically. Animation transition is not main functionality for my lightbox, so I've made do with simple implementation.

I've added new member variable _anim.step to check the current state regrding animation.

  • 0 : initial resizing (opening lightbox)
  • 1 : fading in (opening lightbox)
  • 2 : done animation (lightbox is opened)
  • 3 : fading out (closing lightbox)

So it's quite obvious what the script is doing in _run.

_run : function()
{
  var self = this;
  self._set_size(true);
  if ( self._anim.step == 0 || self._anim.w != self._img.width || self._anim.h != self._img.height )
  {
    self._doResizing();
  }
  else if ( self._anim.step == 1 )
  {
    self._doFadeIn();
  }
  else if ( self._anim.step == 3 )
  {
    self._doFadeOut();
  }
  else
  { // normal state
    self._img.width = self._anim.w;
    self._img.height = self._anim.h;
    self._show_caption(true);
  }
}

Resizing image will occur when a user enlarges the image, resizes the window, or changes the zoom level of the image. So the lightbox will do resizeing in those cases as well.

The latest lightbox script (ver 20090729) also supports the delayed initialization.

Normally the lightbox will check through all anchors (links) in the page when the page is loaded. There is the following code at the end of script:

Spica.Event.run(function() { 
  var lightbox = new Lightbox({
    loadingimg:'resource/loading.gif',
    expandimg:'resource/expand.gif',
    shrinkimg:'resource/shrink.gif',
    blankimg:'resource/blank.gif',
    previmg:'resource/prev.gif',
    nextimg:'resource/next.gif',
    closeimg:'resource/close.gif',
    effectimg:'resource/zzoop.gif',
    effectpos:{x:-40,y:-20},
    effectclass:'effectable',
    resizable:true,
    animation:true
  });
});

The code Spica.Event.run means running at onLoad.

You can modify this code if you want to update or initialize the lightbox at your own timing as follows:

var lightbox = new Lightbox({
  loadingimg:'resource/loading.gif',
  expandimg:'resource/expand.gif',
  shrinkimg:'resource/shrink.gif',
  blankimg:'resource/blank.gif',
  previmg:'resource/prev.gif',
  nextimg:'resource/next.gif',
  closeimg:'resource/close.gif',
  effectimg:'resource/zzoop.gif',
  effectpos:{x:-40,y:-20},
  effectclass:'effectable',
  resizable:true,
  animation:true,
  skipInit:true
});

Then later you can call refresh method at the time when the page is ready.

lightbox.refresh(window.document);

window.document could be any DOM element here.

localizer.js - multilingualization in JavaScript

  • 2008.02.08 Friday
  • dev

I just consider internationalization on JavaScript. It should have simple and visceral interface.

For instance,

document.write(_('Hello world!'));

We can get a localized string via the function _.

The name of function, _ is used in a standard internationalization gettext.

var __Localizer = function()
{
  this.strings = {};
  this.getLocalizedString = function(str)
  {
    if (__Localizer.strings[str] && __Localizer.strings[str] != '')
      return __Localizer.strings[str];
    return str;
  };
  return this;
}
__Localizer = new __Localizer();
_ = __Localizer.getLocalizedString;

__Localizer is defined as a global object here.

To configure the list of localized strings against __Localizer.strings, the following javascript will be loaded:

__Localizer.strings = {
  'Hello world!' : 'Hallo Weld!'
};

The localized data script (locale/de.js) can be included in header of HTML document as follows:

<head>
<meta http-equiv="Content-Type" content="text/html; charset=UTF-8" />
<meta http-equiv="Content-Script-Type" content="text/javascript" />
<meta http-equiv="Content-Style-Type" content="text/css" />
<title>samples - localizer</title>
<script type="text/javascript" src="localizer.js"></script>
<script type="text/javascript" src="locale/de.js"></script>
</head>

I think it's better to consider to use lang or xml:lang attribute in html element. The following code will load localized data automatically depends on lang attribute:

var __Localizer = function()
{
  this.strings = {};
  this.getLocalizedString = function(str)
  {
    if (__Localizer.strings[str] && __Localizer.strings[str] != '')
      return __Localizer.strings[str];
    return str;
  };
  var path = '';
  var jses = document.getElementsByTagName('script');
  for (var i=0,n=jses.length;i<n;i++)
  {
    if (jses[i].src.indexOf('localizer.js') == -1) continue;
    path = jses[i].src.replace('localizer.js','');
    break;
  }
  var html = document.getElementsByTagName('html')[0];
  if (html)
  {
    var lang = html.getAttribute('xml:lang') || html.getAttribute('lang');
    if (!lang) lang = 'en';
    document.write(['\n<','script type="text/javascript" src="',path,'locale/',lang,'.js"></','script>'].join(''));
  }
  return this;
};
__Localizer = new __Localizer();
_ = __Localizer.getLocalizedString;

We can use document.createElement to generate a script element, but document.createElement may not work under some browsers. So I use document.write instead of document.createElement.

The script is named as "localizer.js", and language data should be put into "locale/" directory as follows.

  • localizer.js
  • locale/
    • en.js (English)
    • ja.js (Japanese)
    • de.js (German)
    • ... any other language data

A sample HTML document looks like:

<?xml version="1.0" encoding="UTF-8"?>
<!DOCTYPE html PUBLIC "-//W3C//DTD XHTML 1.1//EN" "http://www.w3.org/TR/xhtml11/DTD/xhtml11.dtd">
<html xmlns="http://www.w3.org/1999/xhtml" xml:lang="ja">
<head>
<meta http-equiv="Content-Type" content="text/html; charset=UTF-8" />
<meta http-equiv="Content-Script-Type" content="text/javascript" />
<meta http-equiv="Content-Style-Type" content="text/css" />
<title>sample - localizer.js</title>
<script type="text/javascript" src="localizer.js"></script>
</head>
<body>
<p>&quot;Hello world!&quot; is translated in Japanese.</p>
<p>However this document is writtin in English, so it looks nothing to be changed. You can also see <a href="en.html">English page</a>.</p>
<hr />
<p><script type="text/javascript">
<!--
  document.write(_('Hello world!'));
// -->
</script></p>
</body>
</html>

We can see "Hello world!" in source code, however this string will be translated in Japanese because of xml:lang attribute ("ja").

If there is no resource for corrsponding language, the string won't be translated.

This script is distributed under MIT license. => Download localizer and samples.

merging hashs in perl

  • 2007.11.07 Wednesday
  • dev

I've investigated the merge of hashs (associative arrays) in perl. Then I've recorded it as a note for myself.

Probably the following code is the most intuitive.

%hash = (%hash, %addition);

To add %addition into %hash.

my %hash = (
  'key1' => 'value1',
  'key2' => 'value2',
);
my %addition = (
  'key3' => 'value3',
  'key4' => 'value4',
  'key1' => 'override1',
);
%hash = (%hash, %addition);

When the above code is run, %hash will be as follows:

  'key1' => 'override1',
  'key2' => 'value2',
  'key3' => 'value3',
  'key4' => 'value4',

A value of key1 is overwritten.

We can use while or foreach loop to merge hashes.

The following code uses while and each:

while (my($key,$val) = each (%addition))
{
  $hash{$key} = $val;
}

The following code uses foreach and keys:

foreach my $key (keys %addition)
{
  $hash{$key} = $addition{$key};
}

We can also use map to merge hashes such as:

map { $hash{$_} = $addition{$_} } keys %addition;

At last, we can use slice. Using "slice" is like a hack, I'm not familiar with this way.

@hash { keys %addition } = values %addition;

We should use @hash instead %hash to use slice.

Using hash reference, we can code as follows:

# normal merge
$hash = {%{$hash}, %addition};
# use while
while (my($key,$val) = each (%addition))
{
  $hash->{$key} = $val;
}
# use foreach
foreach my $key (keys %addition)
{
  $hash->{$key} = $addition{$key};
}
# use map
map { $hash->{$_} = $addition{$_} } keys %addition;
# use slice
@{$hash} { keys %addition } = values %addition;

I've taken benchmarks for those ways. The code for the benchmarks is in sequel part of this article.

read more ...
1/1