
Tinted image for UIImage
- 2014.05.30 Friday
- dev
![[画像]画面に表示するイメージ画像に色付けしたい……。](http://serennz.sakura.ne.jp/sb/img/file430_tinted-image-sample.png)
iOS のアプリケーションでハイライト状態などを示すため、生成した画像イメージに対して色付けしたいときがあります。
UIView には tintColor というプロパティがあって、色付けが簡単にできそうなのですが、イメージを表示する UIImageView に tintColor を設定しても何も変わりません。
そこで以下のようなヘルパークラスを用意して利用しています。
@interface SBLImageHelper
/**
 *  Generates an image which is tinted with a given color.
 *  @param image - an image to be tinted
 *  @param color - tint color
 *  @return an instance of UIImage
 */
+ (UIImage *)tintedImageFromImage:(UIImage *)image
                        withColor:(UIColor *)color;
@end


@implementation SBLImageHelper

+ (UIImage *)tintedImageFromImage:(UIImage *)image
                        withColor:(UIColor *)color
{
  UIImage *output = nil;
  CGRect rect = CGRectMake(0, 0, image.size.width, image.size.height);

  if (UIGraphicsBeginImageContextWithOptions != NULL)
  {
    UIGraphicsBeginImageContextWithOptions(image.size,
                                           NO,
                                           image.scale);
  }
  else
  {
    UIGraphicsBeginImageContext(image.size);
  }

  CGContextRef context = UIGraphicsGetCurrentContext();

  // -- flipping geometry
  CGContextTranslateCTM(context, 0, image.size.height);
  CGContextScaleCTM(context, 1.0, -1.0);

  // -- setting up blend mode
  CGContextSetBlendMode(context, kCGBlendModeNormal);

  // -- first drawing the image
  CGContextDrawImage(context, rect, image.CGImage);

  // -- then setting up mask and fill the color
  CGContextClipToMask(context, rect, image.CGImage);
  CGContextSetFillColorWithColor(context, color.CGColor);
  CGContextFillRect(context, rect);

  output = UIGraphicsGetImageFromCurrentImageContext();
  UIGraphicsEndImageContext();

  return output;
}

@end
次のように使います。
UIColor *tintColor = [[UIColor redColor] colorWithAlphaComponent:0.5];
UIImage *originalImage = [UIImage imageNamed:@"sample"];
UIImage *tintedImage = [SBLImageHelper tintedImageFromImage:originalImage
                                                  withColor:tintColor];
Objective-C にはカテゴリーという既存のクラスを拡張するための仕組みがありますが、すでにあるメソッドと同じ名前のメソッドを追加すると、どっちのメソッドが利用されるか分からなくなってしまうという強烈な副作用があります。
ですので、個人的にはあまりオススメしませんが、UIImage のカテゴリーとして拡張するバージョンだと以下のようになるでしょうか。
@interface UIImage (SBLImageHelper)
/**
 *  Generates an image which is tinted with a given color.
 *  @param color - tint color
 *  @return an instance of UIImage
 */
- (UIImage *)imageWithTintColor:(UIColor *)color;

@end


@implementation UIImage (SBLImageHelper)

- (UIImage *)imageWithTintColor:(UIColor *)color
{
  UIImage *output = nil;
  CGRect rect = CGRectMake(0, 0, self.size.width, self.size.height);

  if (UIGraphicsBeginImageContextWithOptions != NULL)
  {
    UIGraphicsBeginImageContextWithOptions(self.size,
                                           NO,
                                           self.scale);
  }
  else
  {
    UIGraphicsBeginImageContext(self.size);
  }

  CGContextRef context = UIGraphicsGetCurrentContext();

  // -- flipping geometry
  CGContextTranslateCTM(context, 0, self.size.height);
  CGContextScaleCTM(context, 1.0, -1.0);

  // -- setting up blend mode
  CGContextSetBlendMode(context, kCGBlendModeNormal);

  // -- first drawing the image
  CGContextDrawImage(context, rect, self.CGImage);

  // -- then setting up mask and fill the color
  CGContextClipToMask(context, rect, self.CGImage);
  CGContextSetFillColorWithColor(context, color.CGColor);
  CGContextFillRect(context, rect);

  output = UIGraphicsGetImageFromCurrentImageContext();
  UIGraphicsEndImageContext();

  return output;
}

@end
この記事は qiita.com の内容を再掲載したものです。
スポンサーリンク
![[写真] リンデンホフの丘からチューリッヒ旧市街を眺める](http://serennz.sakura.ne.jp/sb/img/file420_zurich-panorama.jpg "[写真] リンデンホフの丘からチューリッヒ旧市街を眺める")
![[写真] チューリッヒ中央駅・車は当然ながら左ハンドル右側通行](http://serennz.sakura.ne.jp/sb/img/file429_zurich-trafficsigns.jpg "[写真] チューリッヒ中央駅・車は当然ながら左ハンドル右側通行")
![[写真] チューリッヒ中央駅・博物館通り](http://serennz.sakura.ne.jp/sb/img/file427_zurich-museumstr.jpg "[写真] チューリッヒ中央駅・博物館通り")
![[写真] チューリッヒ中央駅にて](http://serennz.sakura.ne.jp/sb/img/file422_zurich-banhofsigns.jpg "[写真] チューリッヒ中央駅にて")
![[写真] チューリッヒ大聖堂](http://serennz.sakura.ne.jp/sb/img/file421_zurich-grossmunster.jpg "[写真] チューリッヒ大聖堂")
![[画像] iOS6 でのホーム画面](http://serennz.sakura.ne.jp/sb/img/file418_ios6-homescreen.png)
 多機能エディタ
 ![[画像] mi ver 3 - インタフェースが刷新されました。](http://serennz.sakura.ne.jp/sb/img/file414_mi_300b1_mainscreen.jpg)
![[画像] mi ver 3 - 設定ウィンドウが大幅に刷新されています。](http://serennz.sakura.ne.jp/sb/img/file417_mi_300b1_mode-colorsettings.jpg)
![[画像] mi ver 3 - 新規に追加された差分表示機能。](http://serennz.sakura.ne.jp/sb/img/file415_mi_300b1_diff.jpg)
 アプリケーションのプロジェクトに組み込む
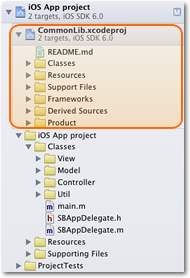 静的ライブラリとして生成する
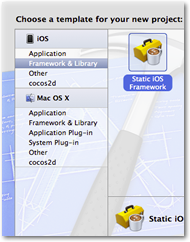 フレームワークとして生成する
 iOS 版 Facebook の実装が HTML5 アプリケーションからネイティブアプリケーション (CocoaTouch フレームワークを使ったアプリケーション) に変更されたのは
![[図] Visual Studio 2010 Express の起動画面](http://serennz.sakura.ne.jp/sb/img/file408_vs2012exp-splash.jpg "Visual Studio 2010 Express の起動画面")
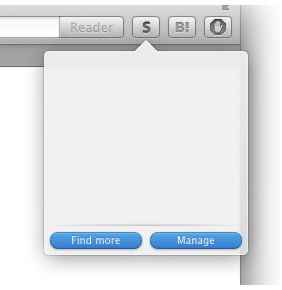
![[画像] Reeder on Safri](http://serennz.sakura.ne.jp/sb/img/file403_reeder_on_safari.jpg "Reeder on Safri")

![[写真] 今年の誕生日カード](http://serennz.sakura.ne.jp/sb/img/file393_birthdaycard_to_daughter_2012.jpg "今年の誕生日カード")
![[図] 紙半分の折り目にあたる部分に線を引く](http://serennz.sakura.ne.jp/sb/img/file397_how_to_make_popup_letter-1.png "紙半分の折り目にあたる部分に線を引く")
![[図] 折り目にまたがるように文字を置く](http://serennz.sakura.ne.jp/sb/img/file398_how_to_make_popup_letter-2.png "折り目にまたがるように文字を置く")
![[図] 出っ張る長さを測る](http://serennz.sakura.ne.jp/sb/img/file399_how_to_make_popup_letter-3.png "出っ張る長さを測る")
![[図] 文字の上に出っ張り補助部を付ける](http://serennz.sakura.ne.jp/sb/img/file400_how_to_make_popup_letter-4.png "文字の上に出っ張り補助部を付ける")
![[図] 他の文字も同じようにして補助をつける](http://serennz.sakura.ne.jp/sb/img/file401_how_to_make_popup_letter-5.png "他の文字も同じようにして補助をつける")
![[図] 折り目になる部分](http://serennz.sakura.ne.jp/sb/img/file402_how_to_make_popup_letter-6.png "折り目になる部分")
![[写真] カードの裏面に印刷](http://serennz.sakura.ne.jp/sb/img/file394_how_to_make_card-1.jpg "カードの裏面に印刷")
![[写真] 線に沿って切っていきます](http://serennz.sakura.ne.jp/sb/img/file395_how_to_make_card-2.jpg "線に沿って切っていきます")
![[写真] ゆっくり折っていきます](http://serennz.sakura.ne.jp/sb/img/file396_how_to_make_card-3.jpg "ゆっくり折っていきます")